树莓派-制作家庭监控-在云端实时查看
作者:Vic ,分类:Raspberry-Pi(树莓派) 发布于 2020-06-11 14:53:32
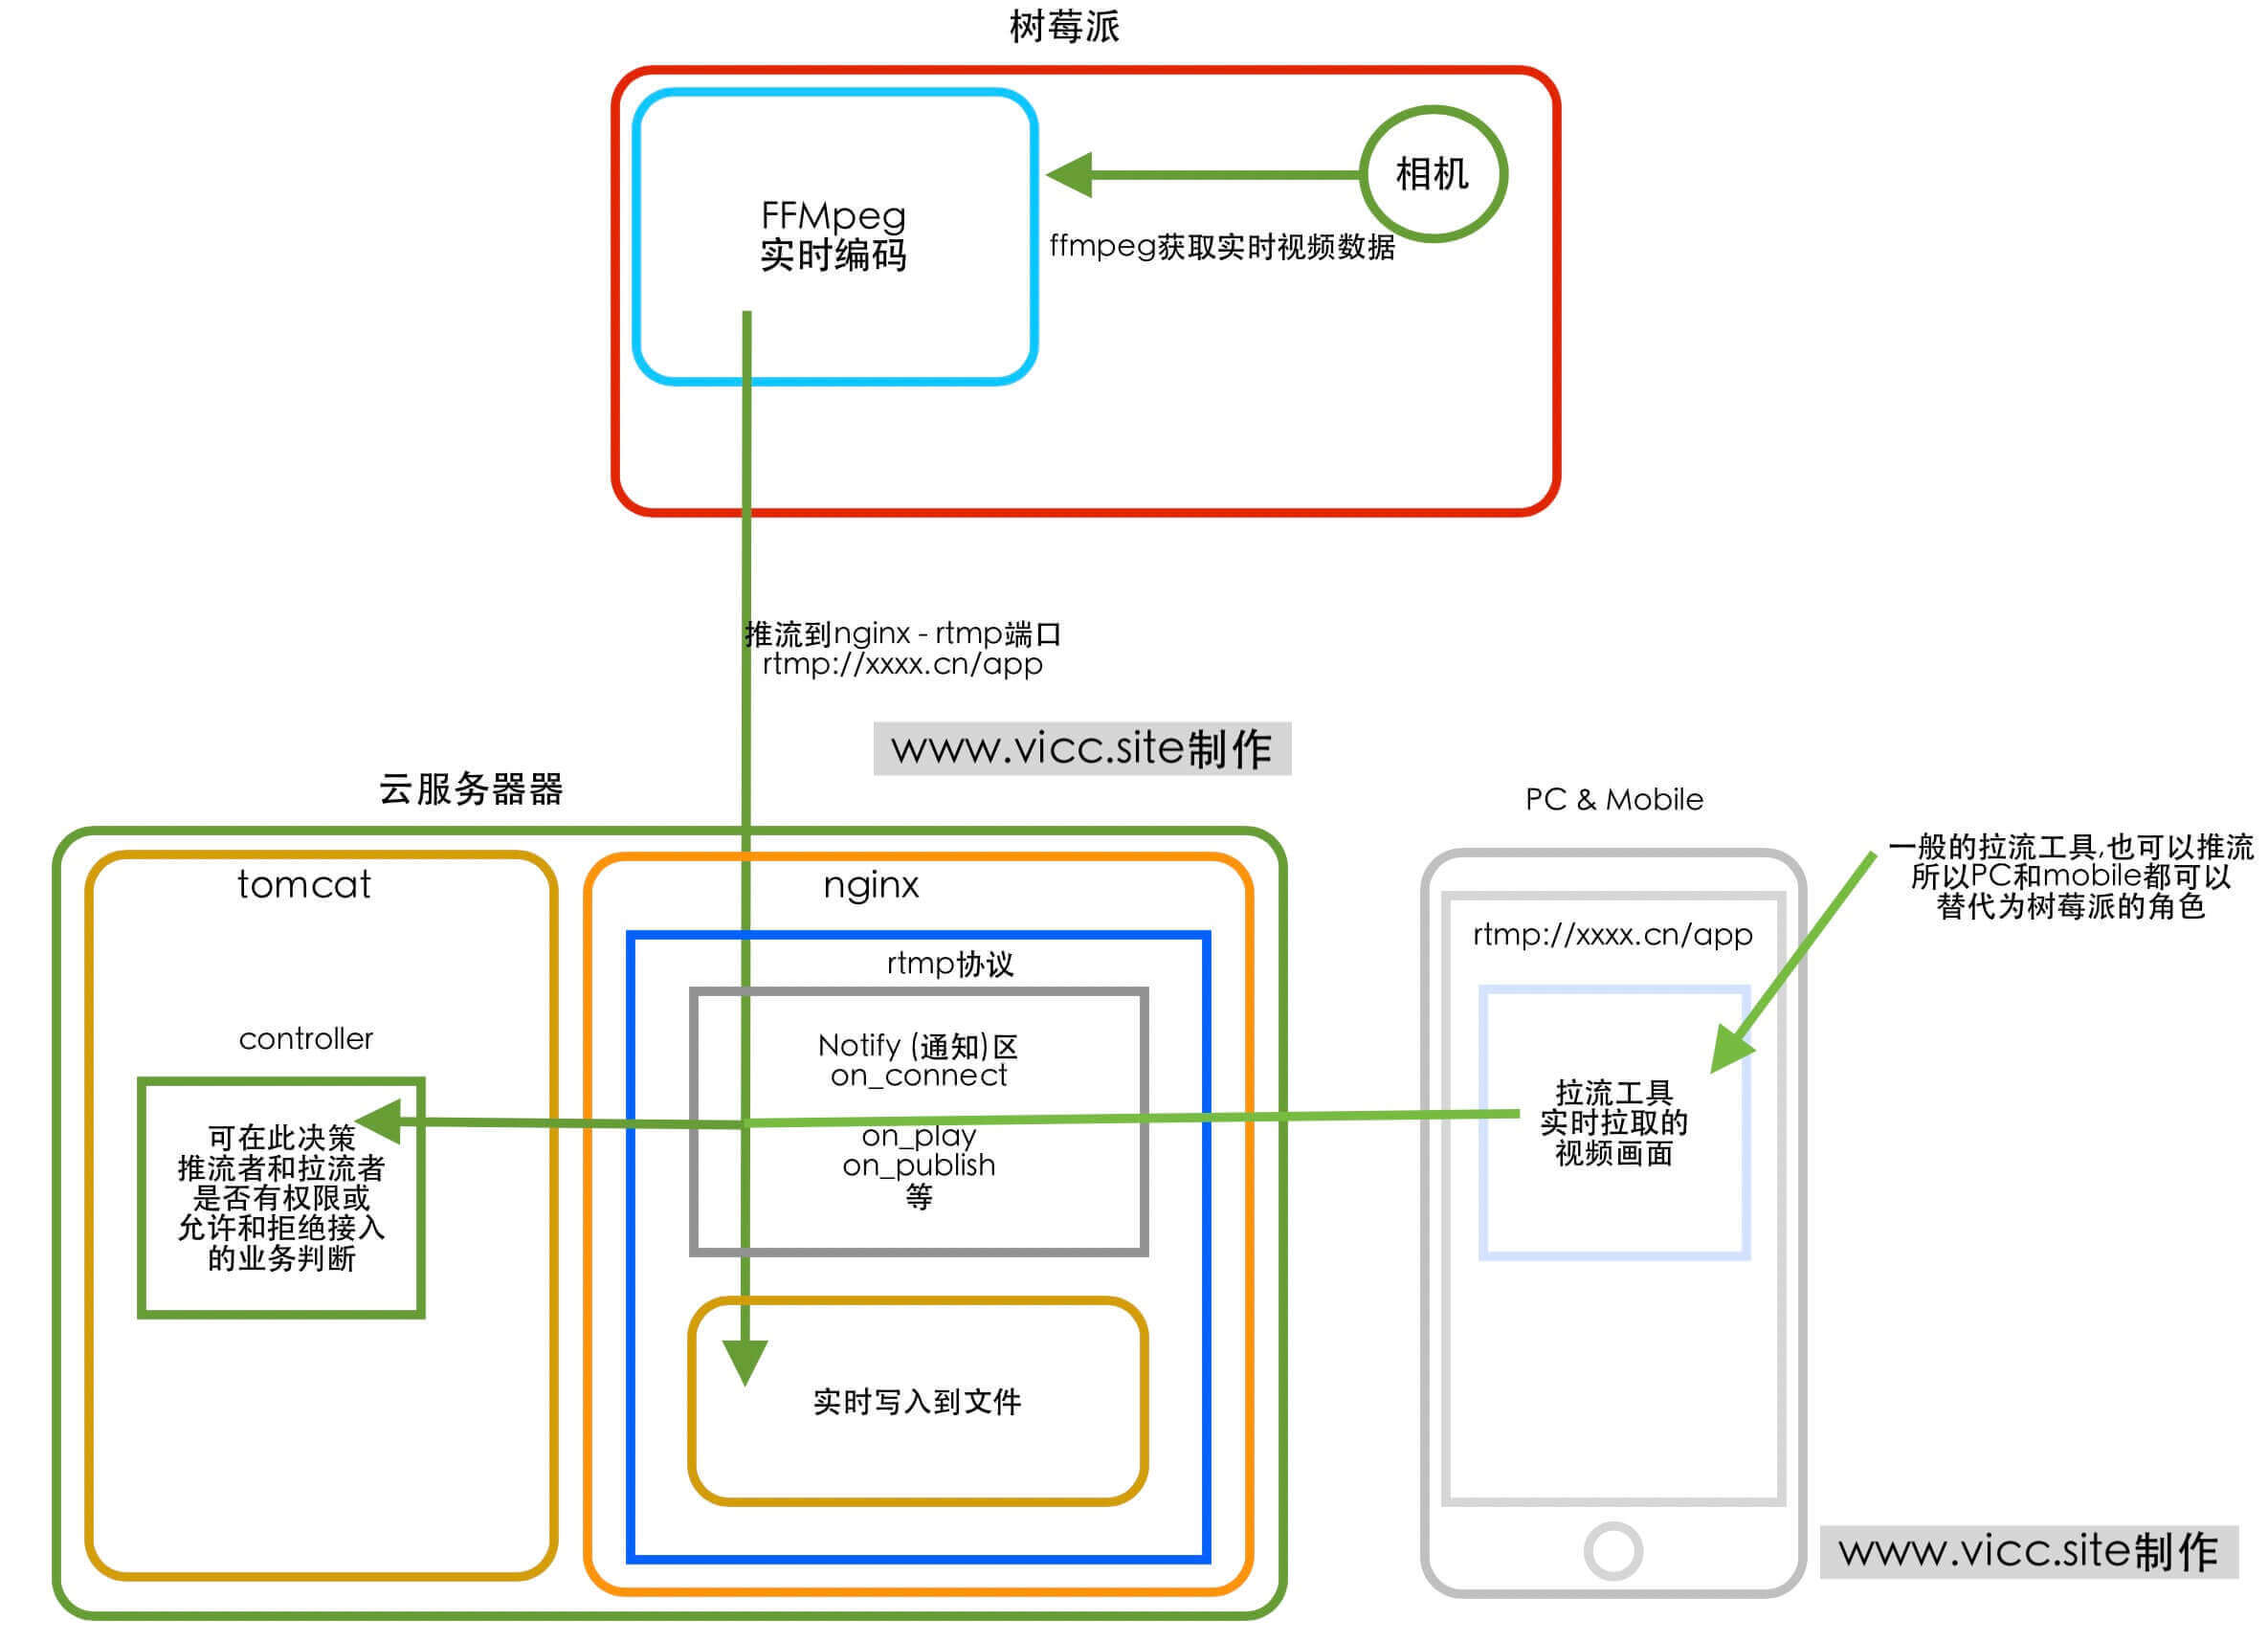
画了个图方便理解 , 解决方案如下
ffmpeg推流命令
命令和编码参数不同 , 会导致延时时长不同 , 我的延时在本地局域网在1-2秒左右 , ffmpeg的更多命令可以看官网 ffmpeg-doc , 关于-preset ultrafast -tune:v zerolatency 编码速度参数看官方 Video Encoding Guide
ffmpeg -framerate 15 -video_size 640x480 -i /dev/video0 -vcodec h264_omx -preset ultrafast -tune:v zerolatency -f flv rtmp://xxx.cn:1935/app
nginx rtmp 配置
on_play 或 on_publish通知类的请求到tomcat , rtmp会把客户端的ip等信息放到Parameter中方便service决策拉流者或推流者的身份 并响应给rtmp对应的http状态码让rtmp知道 , 该连接是允许继续操作还是丢弃该请求 .
- HTTP 2xx code continues RTMP session : 2xx状态码继续操作保持会话
- HTTP 3xx将RTMP重定向到另一个流,该流的名称来自 LocationHTTP响应标头。如果新的流名称以开头,rtmp:// 则会创建远程中继。中继要求指定IP地址而不是域名,并且仅适用于大于1.3.10的Nginx版本。另请参阅notify_relay_redirect。
- 否则,RTMP连接将被丢弃 , 返回4xx或5xx状态码将被rtmp丢弃连接
- 如果上面配置参数不理解或你有其他需求 , 可以看官方github文档 ,我就是一点一点这么理解的 rtmp-github , 看不懂可以翻译
# live stream confrtmp {server {listen 1935;application app {live on; #开启直播notify_method get; # 通知请求方法on_play http://127.0.0.1:8080/video/play; # 请求到tomcat的 拉流连接通知决策地址on_publish http://127.0.0.1:8080/video/publish; # 请求到tomcat的 推流连接通知决策地址max_connections 10; # 连接数量# 实时记录视频到文件recorder savelive{record video; # 只记录视频,也可以使用all参数同时记录音频和视频record_max_size 200M; # 单个文件最大200M# record_path /home/rpi-video; # 文件路径record_suffix %Y-%m-%d-%H_%M.flv; # 已年月日时分作为视频名称}}}}
还可以在http块加入以下配置, 方便查看rtmp提供的实时连接日志 , http://127.0.0.1:8080/stat
location /stat {rtmp_stat all;rtmp_stat_stylesheet stat.xsl;}location /stat.xsl {root /你的路径/nginx-rtmp-module-master; #the path of nginx-rtmp-module}
Tomcat处理通知决策
我这里用的是ip白名单模式来防止其他人恶意推流和拉流 , 刚才上面也讲了, 允许的连接返回2xx状态就可以了 , 我这之所以用throw的方式返回2xx和其他状态, 因为我正常随意返回个字符串就应该代表2xx的状态了 , 但测试了多次不行 , 最后就选了这种方式 . flowCache是个缓存 , 你可以把允许连接的IP白名单加入里面 , 就可以了 , 我觉得很方便 , request.getParameter("addr"); 是rtmp透传过来的客户端信息 .在 rtmp-github 里都有.
/*** nginx rtmp 播放流连接决策* @return*/@ResponseBody@ResponseStatus@RequestMapping(value = "/play",method = RequestMethod.GET)public String play(HttpServletRequest request) {String ip = request.getParameter("addr");// 该ip是否在 允许拉流的白名单中if(flowCache.exist(ip)){throw new PermissionPassedException("permission passed");}else{flowCache.put(ip,"拉流被拒绝"+DateTool.now());throw new PermissionDeniedException("permission denied");}}/*** nginx rtmp 发布流连接决策* @return*/@ResponseBody@RequestMapping(value = "/publish",method = RequestMethod.GET)public String publish(HttpServletRequest request) {String ip = request.getParameter("addr");// 该ip是否在 允许推流的白名单中if(flowCache.exist(ip)){throw new PermissionPassedException("permission passed");}else{flowCache.put(ip,"推流被拒绝:"+ DateTool.now());throw new PermissionDeniedException("permission denied");}}
允许连接
/*** 允许流访问*/@ResponseStatus(value = HttpStatus.OK)public class PermissionPassedException extends RuntimeException{public PermissionPassedException(String message) {super(message);}}
拒绝连接
/*** 无权限访问*/@ResponseStatus(value = HttpStatus.NOT_FOUND)public class PermissionDeniedException extends RuntimeException{public PermissionDeniedException(String message) {super(message);}}